Showing posts with label Sword & Spear. Show all posts

Friday, 17 November 2017

Anglo-Saxons v Vikings Game 2

The 2nd game of a short series of games I'm playing following the exploits of a Viking invasion of a small Anglian peninsular.

This time Mark and Ian joined me for a Sword & Spear game using armies of about 375 points. It represents a counter-attack by the Anglo-Saxons against the Viking landings.
I played the Anglo-Saxons while Mark and Ian played the Vikings.


The Terrain
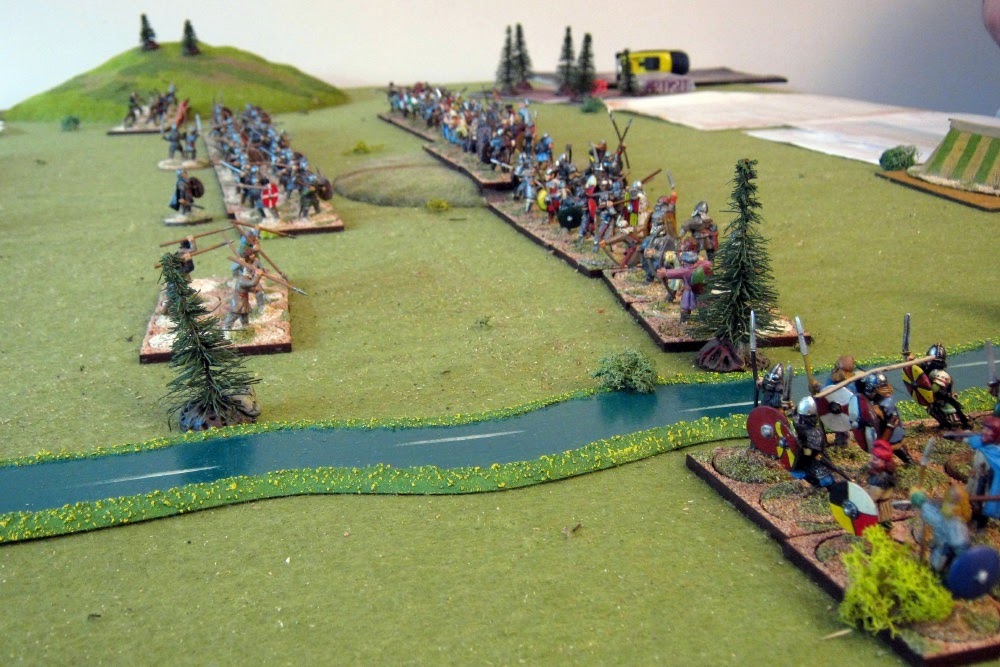
Rather difficult lighting at the time I took the photo, but the Anglo-Saxons will deploy on the left and the Vikings on the right.


The Viking deployment put a mixed column of Huscarls and Warriors on this side of the river to attempt a flank attack.


My plan for the Anglo-Saxons

The Anglo-Saxon deployment relied on the brute force of several units of Armoured Thegns to break through the centre of the Viking main line before the Viking flank attack could move down and manoeuvre over the river. Select Fyrd form the rear line and Camp defence.


This picture better shows the Select Fyrd tasked with defending the camp against the flank attack.


The Game

The front lines approach each other. The Viking flank attack moves down this side of the river.

Two units of Vikings deserve mention here.
The bare-chested Viking Berserkers on the hill are about to charge in with Impact. They got a couple of hits with that and then managed to hold the Thegns for several turns.
The Viking Warrior shieldwall unit alongside them left of the hill also managed to hold off a sustained attack for several turns against another strong Thegn unit absorbing many of my best activation dice. This really slowed the Anglo-Saxon main attack.


The Anglo-Saxon Thegns take the attack to the Vikings as planned, but held up by those Berserkers and that Warrior shieldwall the attack stalls. They should have broken by now. That was the plan wasn't it?
On the Anglo-Saxon right, the Viking flank attack has started to cross the river the Select Fyrd have to move up to them fend off the Thegns flank, rather than just sit and wait to defend the camp as planned.


Luckily for the Select Fyrd, the Viking flank attack on the right has JUST failed to make contact ....

...but more are crossing the ford.


The Select Fyrd hold on for a while and get some support (just off camera to the left unfortunately).
And the Thegns finally start to break through the Viking centre ...

... and they only have eyes for the prize - The Viking camp.


But back at base the Viking flank attack has managed to reach the Anglo-Saxon camp and takes it in one go ...


... whereas the Thegns have failed miserably to hit the Viking camp effectively and get charged in the rear by some rag-tag skirmishers who give them the one hit they need to rout them.


And to make matters worse, more Thegns focused on one unit of Viking Huscarls get hit in the flank by some Viking Warriors and finished off.

With two units and the camp lost in short order the Anglo-Saxons have thrown it away.

Well that'll learn me.

As usual there was plenty of off-camera action giving an exiting game.

Sunday, 8 January 2017

Third Crusade - Battle Of Arsuf, 7th September, 1191.

Crusader cavalry try to repel Saladin's attacks
The Crusaders are approaching Arsuf down the coast road. They have to pass a large wooded area close to the coast road and Saladin has decided to use this wood to launch a major attack on the Crusaders.

This battle represents the early stages of the battle just after Saladin launched his attacks from the wood on the rear of the column. Historically the cavalry on both sides was deployed behind the infantry and when the attacks were launched there was some confusion as the cavalry pushed through the infantry. Rather than trying to resolve this on table I've assumed that stage is over and each side can deploy within their deployment zones as chosen.

I used Sword & Spear rules.

Rather than have one large army on each side, I tried representing the two rear columns of Crusaders as two separate armies, and similarly for the Ayyubid Egyptians. This gave two armies on each side of about 290 points and 8 units each.

LAYOUT AND DEPLOYMENT

North is at the top of this layout.
Crusaders on the left defending against Saladin's attacks from the woods on the right.
Saladin chose this place for a major attack because the woods gave a covered overnight camp and approach, while the battleground was relatively open and suited to cavalry attacks.

ORDER OF BATTLES
Crusaders - Army 1
General, 2 x Knights, 1 Miltary Order Knights, 1 x Spearmen, 1 x Crossbowmen, 1 x Miltary Order Searmen, 1 x Archers, 1 x Turcopole Cavalry

Crusaders - Army 2
General, 1 x Knights, 1 Miltary Order Knights, 2 x Spearmen, 1 x Crossbowmen, 1 x Miltary Order Searmen, 1 x Archers, 1 x Turcopole Cavalry

2 Ayyubid Egyptian Armies - both have the same forces
General, Captain, 1 x Cavalry, 2 x Ghilmen, 1 x Turcoman Light Horse, 1 x Turcoman Cavalry, 1 x Ahdath Militia Spearmen, 1 x Archers Light Foot, 1 x Javelinmen

THE BATTLE

Initially the cavalry on both sides closed the gap.
The Crusader Knights have the Impact ability which gives them an advantage if they actitvate and charge in first in the next turn. If the Egyptian Ghilmen get to activate first they can either loose arrows or charge first and negate the Impact ability of the Crusader Knights.

Sunday, 27 November 2016

Third Crusade - Break the Siege of Acre, 11th July 1191

The city of Acre on the east coast of the Mediterranean had been under siege by the Crusaders since August 1189. The Crusaders had blockaded the city by sea and encircled it on land. In turn they were encircled inland by Egyptians who were trying to relieve the Siege of Acre. The situation came to a head with the arrival of King Richard in June 1191, whose plan was to take Acre and then secure the coast as they moved south towards Jerusalem. In the city, the garrison were on the verge of surrender and Saladin's encircling army made a last attempt too break the Siege of Acre.

An excuse for a big bash to start things off in this series of games.
I used Sword & Spear (2nd Edition) rules by Mark Lewis, published by Great Escape Games.

I have used one unit is represented by 2 square bases, so 4 cavalry figs or 8 infantry figs to a unit.
The red and black dice indicate activations, The numbered discs represent hits. The yellow and blue dice (where shown) represent combat results.

The initial layout,
Crusaders on the left. The City of Acre lies off-table behind the Crusaders.
The deployment was done using the Attack on a Prepared Position scenario but I varied the allowed Stratagems to better suit the situation.
Both sides are heavy on cavalry.
I made the assumption that the Saracens preceded their attack with harassing arrow fire and that the Crusader cavalry had already moved through the infantry to try to push away the attackers leaving the infantry as a back stop.